BigIP: Advanced Web Application Firewall
A comprehensive guide on advanced Web Application Firewall (WAF) policies, focusing on deployment modes, SSL/TLS integration, policy management, geolocation enforcement, and WebSocket protection to enhance security against sophisticated cyber threats.
1. Introduction to F5 BIG-IP Advanced WAF
Overview
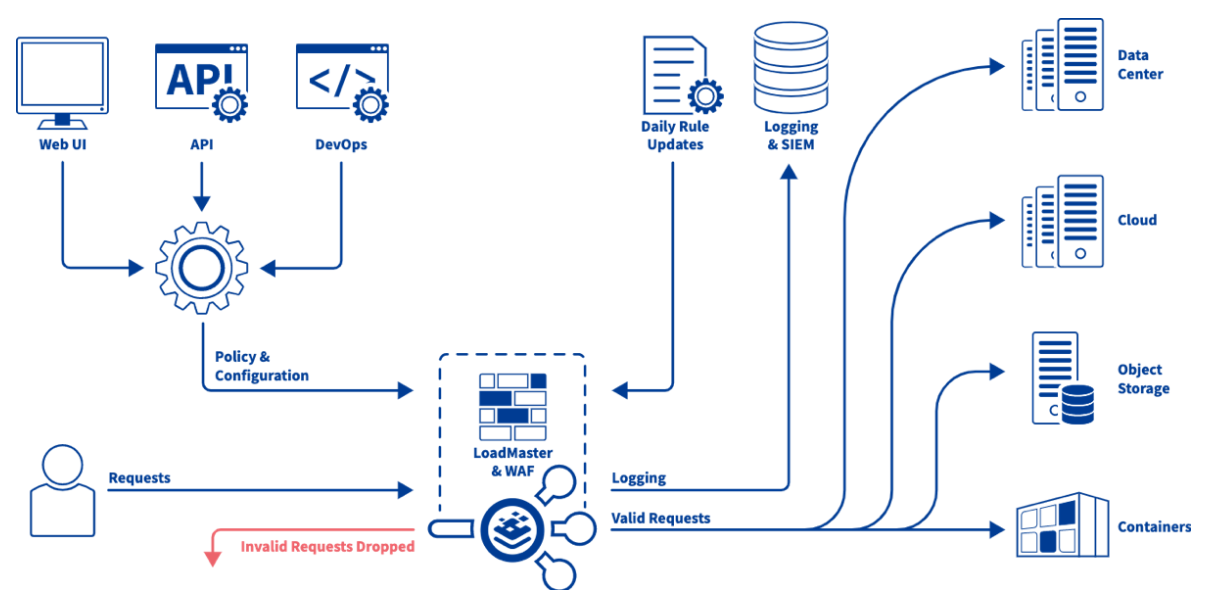
F5 BIG-IP Advanced Web Application Firewall (WAF) is a powerful security solution designed to protect web applications from a wide range of cyber threats. It provides comprehensive security features, including protection against common web vulnerabilities, advanced attack protection, threat detection and response capabilities, session management, and much more.## Importance in Cybersecurity
Importance in Cybersecurity
In today’s digital landscape, web applications are a prime target for cyber attacks. With the increasing sophistication of attackers and the growing complexity of web applications, traditional security measures are often insufficient to defend against evolving threats. F5 BIG-IP Advanced WAF plays a crucial role in cybersecurity by providing:
- Proactive Defense: It helps organizations proactively defend against a multitude of web-based attacks, including SQL injection, cross-site scripting (XSS), cross-site request forgery (CSRF), and more.
- Compliance: F5 BIG-IP Advanced WAF assists organizations in achieving compliance with industry regulations and standards, such as PCI DSS, by implementing robust security controls and logging/reporting features.
- Visibility and Control: It offers visibility into web traffic and application behavior, allowing organizations to identify and mitigate threats in real-time. Additionally, it provides granular control over security policies and enforcement mechanisms.
- Incident Response: With its threat detection and response capabilities, F5 BIG-IP Advanced WAF enables organizations to quickly detect and respond to security incidents, minimizing potential damage and downtime.
Overall, F5 BIG-IP Advanced WAF is a critical component of any cybersecurity strategy, helping organizations safeguard their web applications and data against evolving threats in today’s dynamic threat landscape.
2. Core Security Policies
2.1 Creating Security Policies with F5 BIG-IP Advanced WAF
Security policies form the backbone of any effective cybersecurity strategy. They define the rules and guidelines that govern how an organization protects its assets and data from various threats. In the context of F5 BIG-IP Advanced WAF, creating security policies involves setting up configurations to safeguard web applications against a wide range of cyber attacks. This includes defining policies for simple app security, rapid deployment, manual policy building, and automatic policy building.
Simple App Security Policies
When starting with F5 BIG-IP Advanced WAF, creating simple app security policies is a great way to get a feel for the system. These policies are straightforward and perfect for securing basic web applications quickly.
What is a Simple App Security Policy?
A simple app security policy is a predefined set of rules and protections that you can apply to your web application to protect against common web vulnerabilities.
Steps to Create Simple App Security Policies
Access the BIG-IP Management Interface: Log in to the F5 BIG-IP management interface.
Navigate to Security Policies: Go to the ‘Security’ tab and select ‘Policies’.
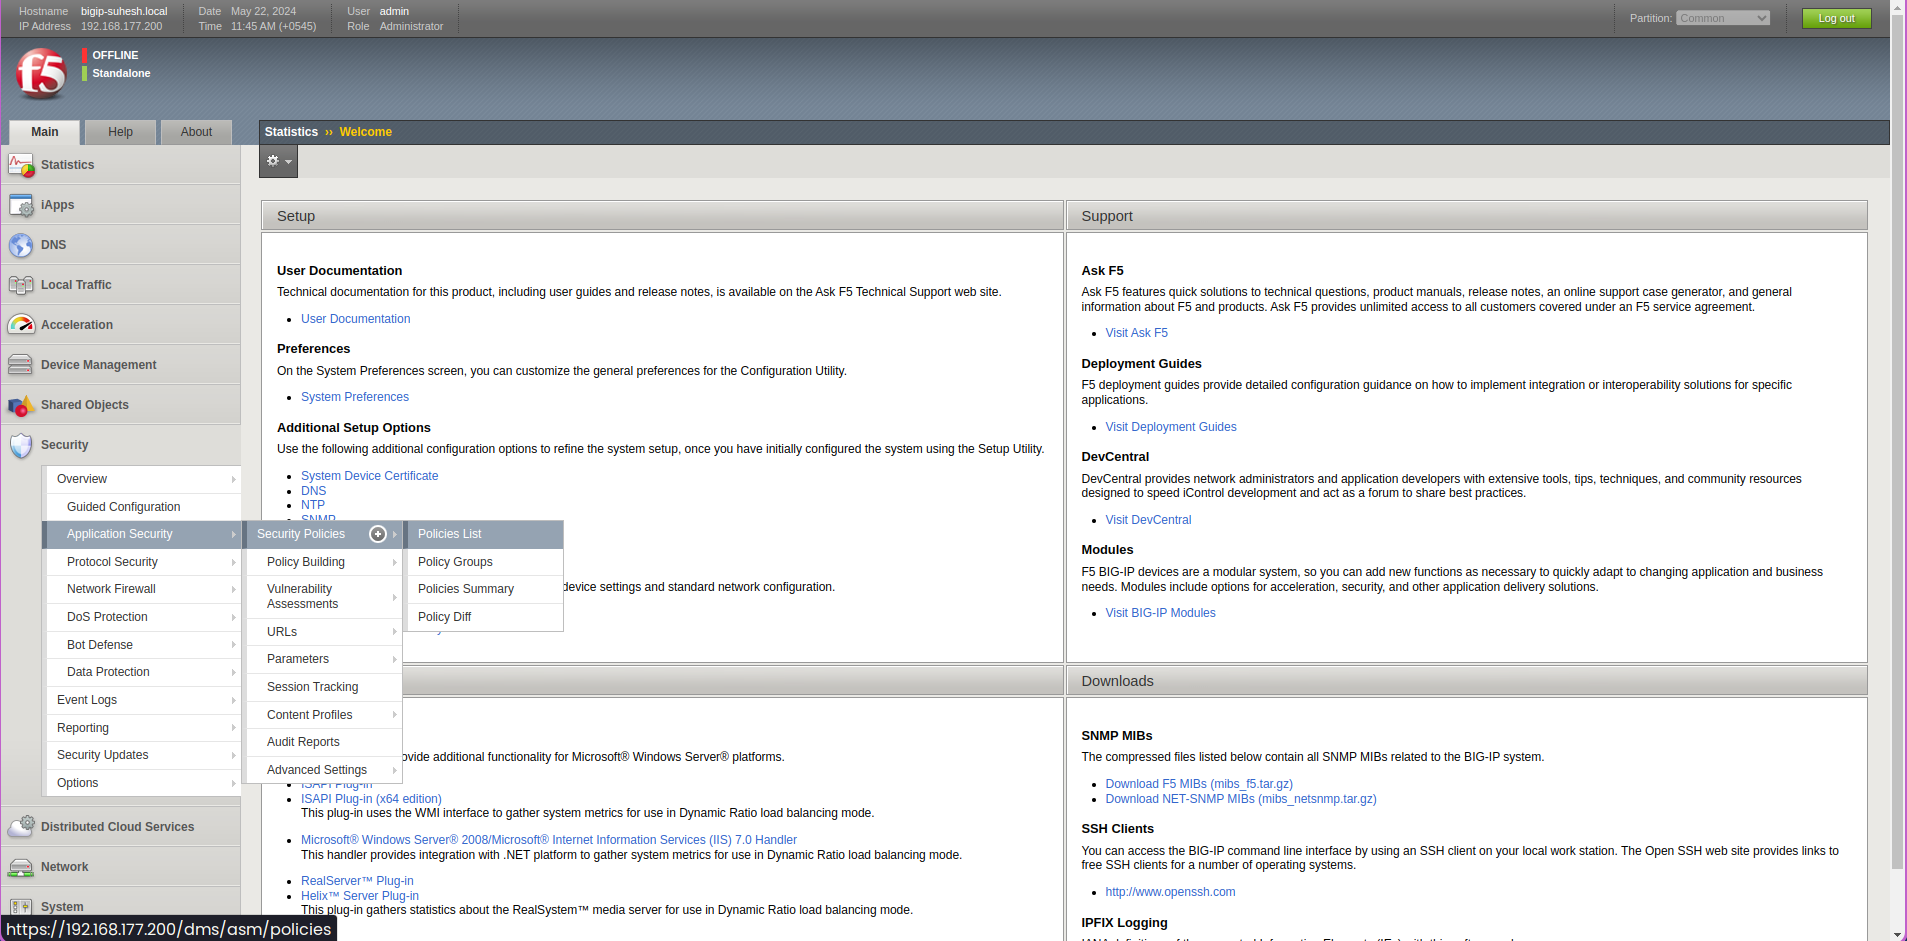
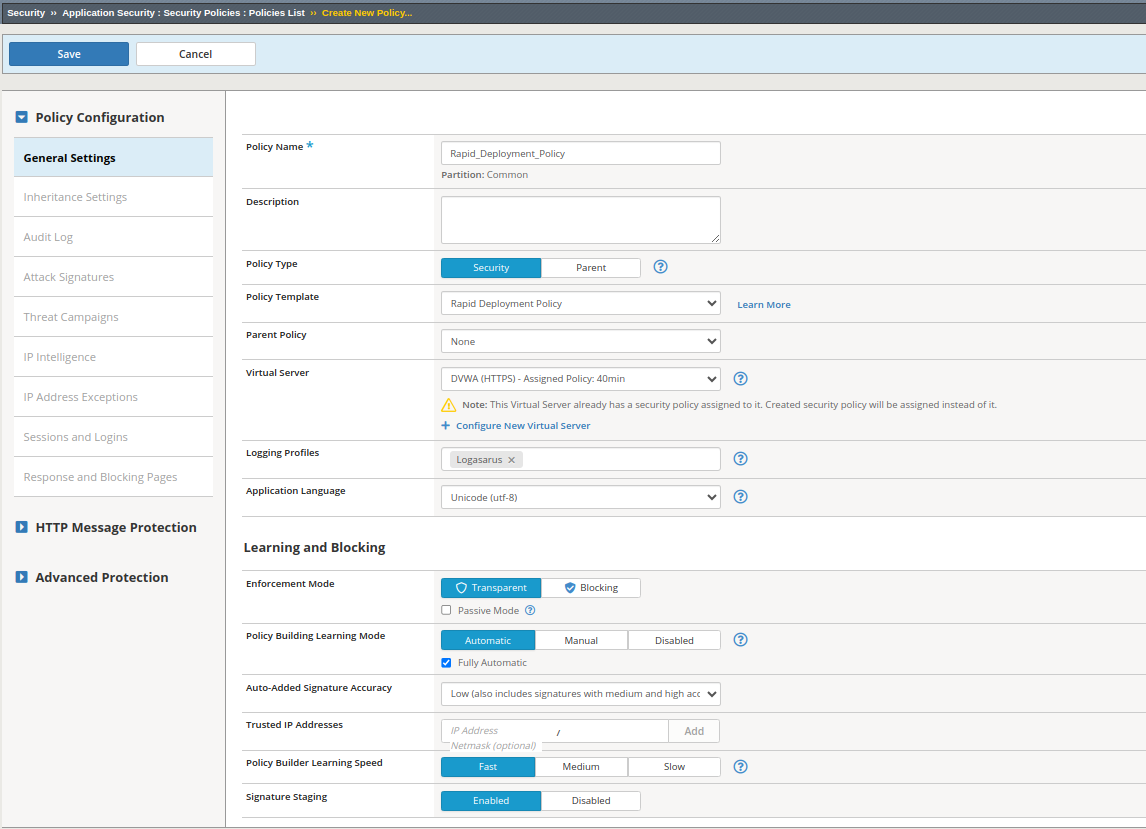
Create a New Policy: Click on ‘Create’ to start a new policy. You can name it something descriptive like “Rapid_Deployment_Policy”.
Choose a Template: Select a predefined template that matches your needs. For simple apps, the “Rapid Deployment” template is often sufficient.
Configure Basic Settings: Set the policy type to “Positive Security Model” which focuses on known good traffic.
Apply the Policy: Once configured, apply the policy to your application.
 This simple policy will cover basic threats and give you a baseline protection for your web application.
Rapid Deployment Security Policies
For those of us needing to secure applications quickly, the Rapid Deployment Security Policies come in handy. They allow you to apply a comprehensive security policy with minimal configuration.
What is a Rapid Deployment Security Policy?
A Rapid Deployment Security Policy is designed to provide a broad spectrum of protection quickly. It’s less granular than a fully customized policy but highly effective for immediate deployment.
Steps to Implement Rapid Deployment Security Policies
Navigate to Security Policies: Again, go to the ‘Security’ tab and select ‘Policies’.
Create a New Rapid Deployment Policy: Click ‘Create’ and select the “Rapid Deployment” template.
Basic Configuration:
- Name: Give your policy a name like “RapidDeployPolicy”.
- Policy Type: Choose “Positive Security Model”.
- Enforcement Mode: Set to “Transparent” initially to monitor traffic without blocking.
Apply to Application: Select the application you want to secure and apply the policy.
Monitor and Adjust: Monitor the traffic and adjust the policy based on the observed behavior.
You can head here to learn more about rapid deployment policy
This approach allows for quick protection, making it ideal for situations where you need to secure an application on short notice.
Manual Security Policy Building
For those who need more control and customization, manual security policy building is the way to go. It allows you to tailor the security settings to your specific application needs.
What is Manual Security Policy Building?
Manual Security Policy Building involves creating and customizing security rules from scratch. This method provides the highest level of customization and control over your web application’s security.
Steps to Build a Manual Security Policy
Start a New Policy: In the ‘Security’ tab, select ‘Policies’ and click ‘Create’.
Select Custom Template: Choose a custom template to start with a blank slate.
Configure Detailed Settings:
- HTTP Protocol Compliance: Ensure all incoming traffic complies with HTTP standards.
- Attack Signatures: Select and configure specific attack signatures to detect and block known threats.
- File Type Enforcement: Specify allowed file types to prevent malicious file uploads.
- Parameter Enforcement: Define rules for allowed parameters to prevent parameter tampering.
Set Enforcement Mode: Set the policy to “Blocking” mode once you’re confident with the configurations.
Apply and Monitor: Apply the policy to your application and monitor the logs for any unusual activity.
Manual policy building can be complex, but it’s highly effective for applications with unique security requirements.
You can head here to learn more about security policies
Automatic Security Policy Building
If you prefer a more automated approach, F5 BIG-IP also offers automatic security policy building. This feature helps create a security policy based on the observed traffic patterns, making it easier to set up without deep manual configuration.
What is Automatic Security Policy Building?
Automatic Security Policy Building uses machine learning and behavioral analysis to create and adjust security policies based on actual traffic. This reduces the manual effort required and ensures the policy evolves with the application.
Steps to Implement Automatic Security Policy Building
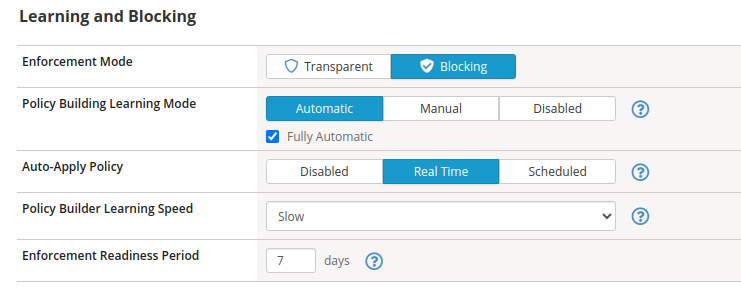
Enable Learning Mode: In the ‘Security’ tab, select ‘Policies’ and click ‘Create’. Enable the learning mode for the new policy.
Initial Configuration:
- Name: Name your policy, e.g., “AutoPolicy”.
- Learning Mode: Set to “Automatic”.
Traffic Learning: Allow the system to monitor traffic for a period (usually a few days to a week) to learn the normal traffic patterns.
Review and Apply Suggestions: The system will suggest policy configurations based on the learned traffic. Review these suggestions and apply them.
Enforcement: Once the policy is refined, set it to “Blocking” mode to start enforcing the rules.
You can learn more about automatic vs manual security policies from here.
Automatic policy building is great for dynamic environments where traffic patterns can change frequently.
2.2 Updating Security Policies
Security policies need to be regularly updated to adapt to evolving threats and changes in the IT environment. Updating security policies involves modifying existing policies or creating new ones to address emerging vulnerabilities and ensure continuous protection. In the context of F5 BIG-IP Advanced WAF, updating security policies includes revising manual policy configurations and adjusting automatic policy settings to enhance the overall security posture of web applications.
Manual Policy Building
Manual policy building allows me to have precise control over the security rules and configurations. Here’s how I update a security policy manually:
Steps to Update a Security Policy Manually
Access the Policy:
- I navigate to the ‘Security’ tab in the BIG-IP management interface and select ‘Policies’.
- I choose the policy I want to update from the list.
Review Current Settings:
- I review the current settings to understand what needs updating. This includes looking at the HTTP protocol compliance, attack signatures, file type enforcement, and parameter enforcement.
- I review the current settings to understand what needs updating. This includes looking at the HTTP protocol compliance, attack signatures, file type enforcement, and parameter enforcement.
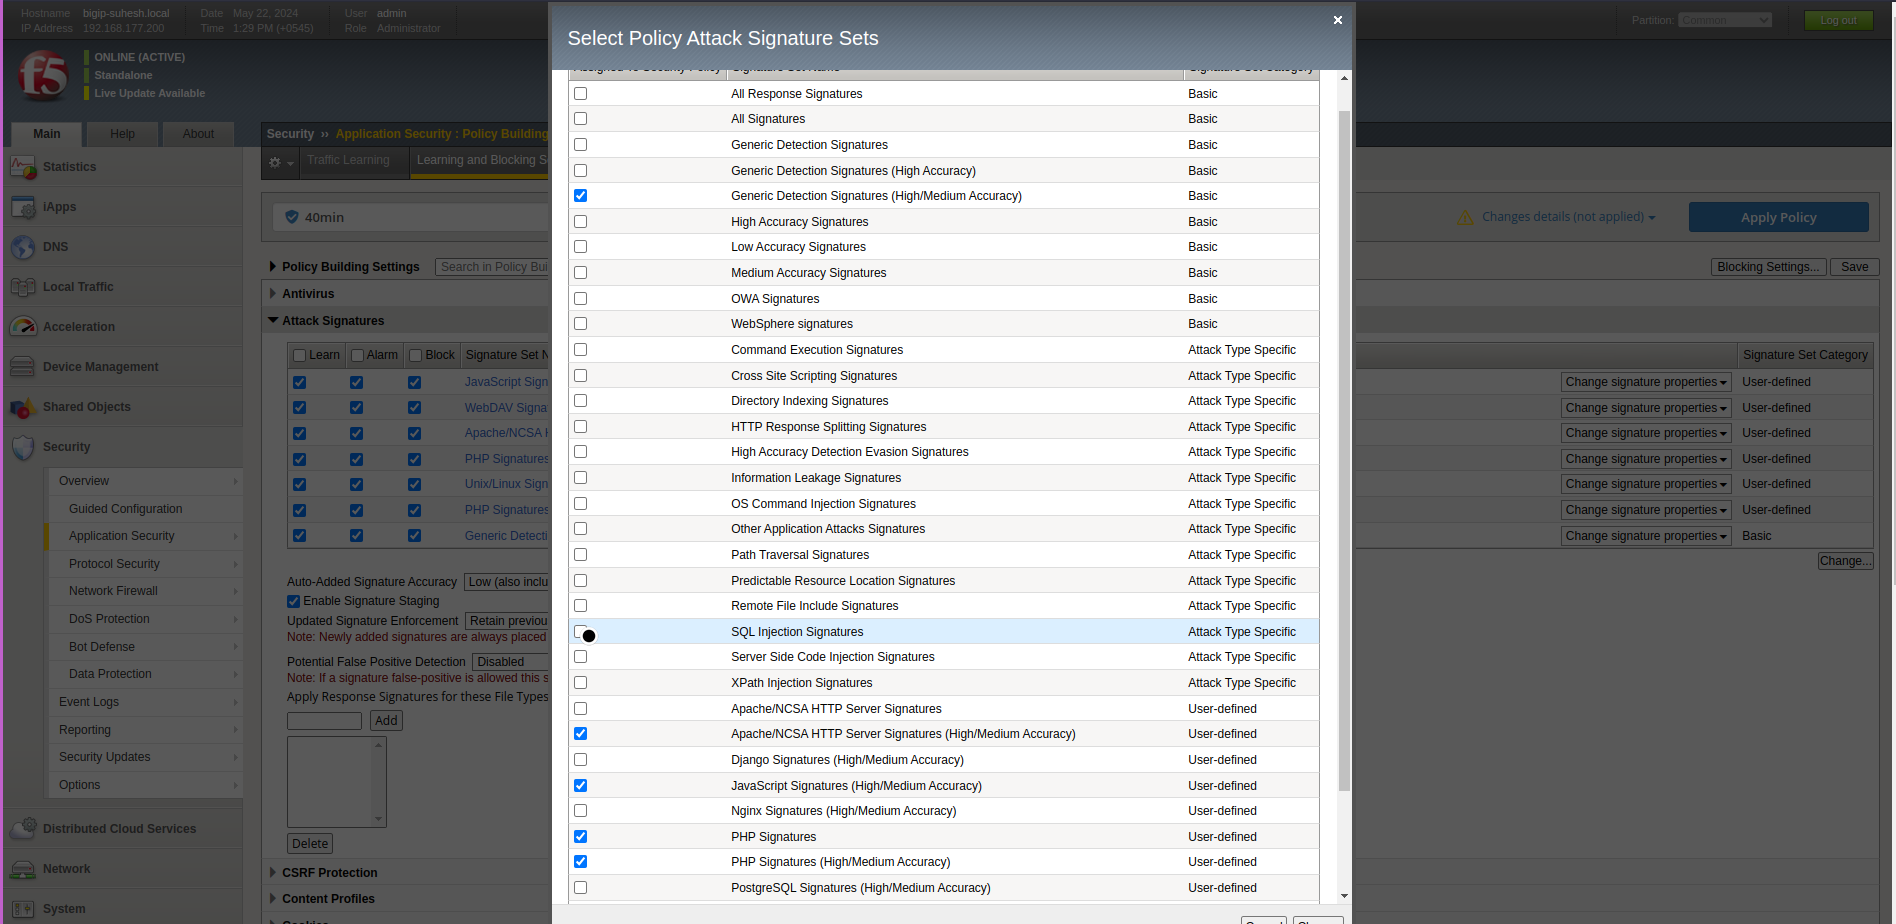
Update Attack Signatures:
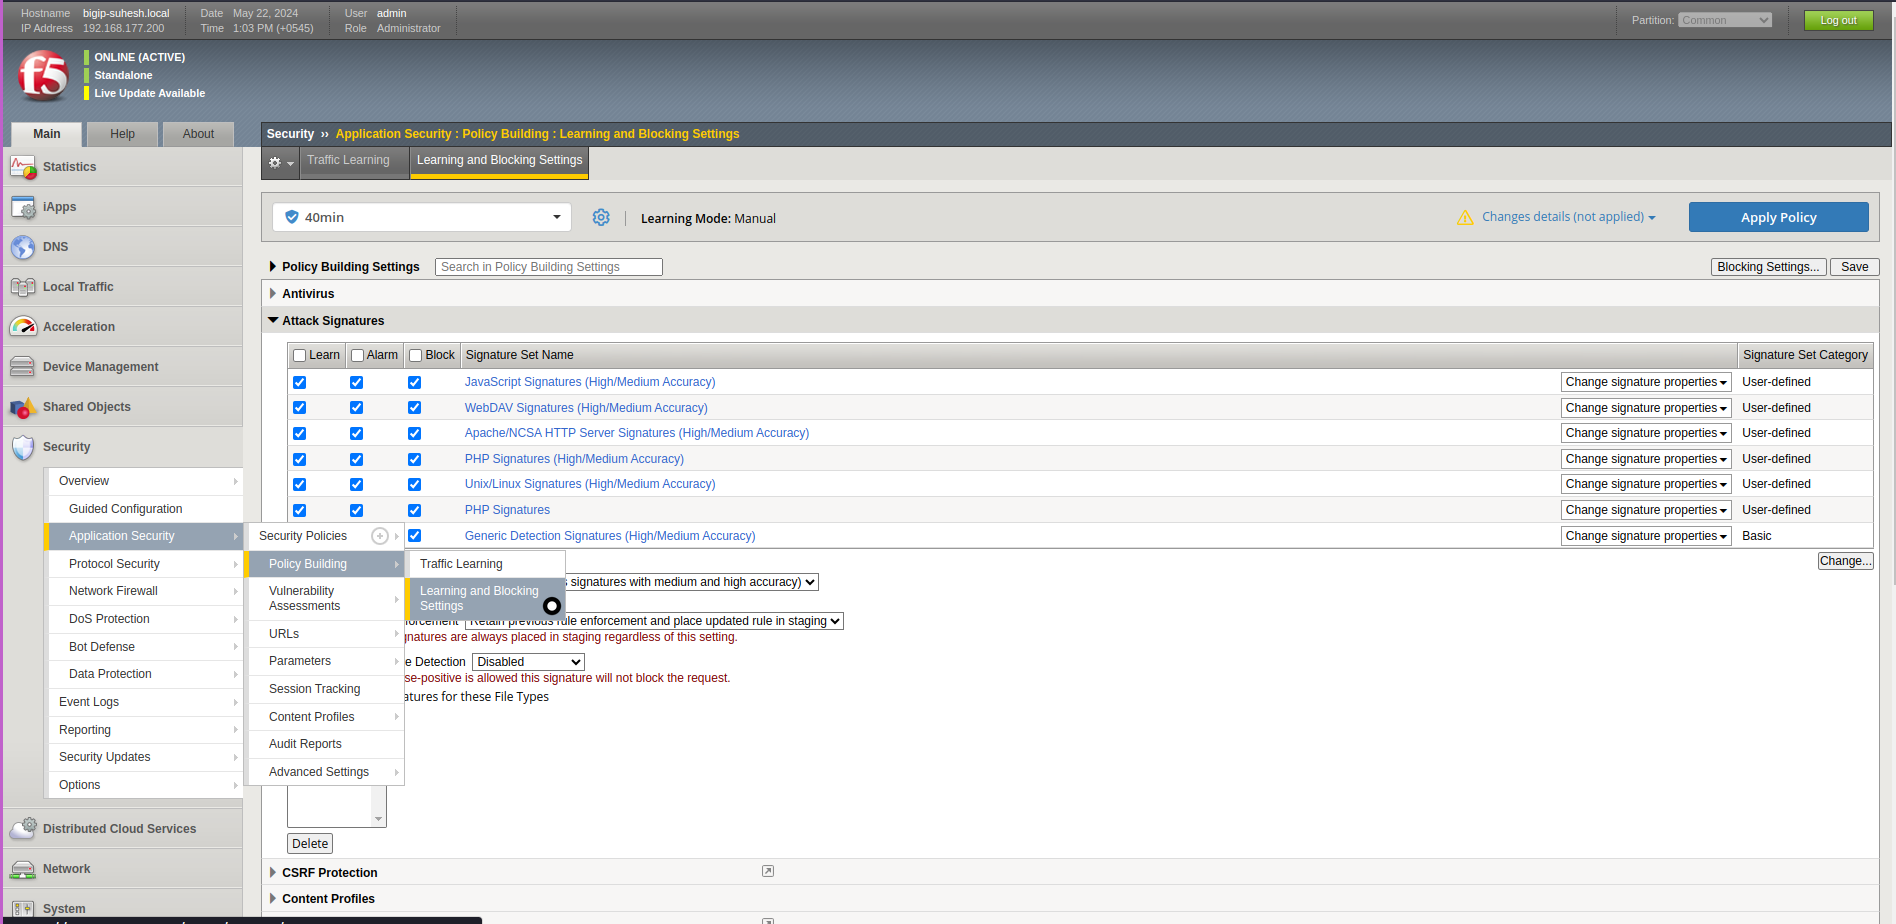
- Navigate to Attack Signatures: I go to ‘Security’ > ‘Application Security’ > ‘Learning and Blocking Settings’ > ‘Attack Signatures’.
- Select Signatures to Update: I select the relevant signatures that need updating.
- Update or Add New Signatures: I update the existing signatures or add new ones as needed from the change button on the lower right side.
Attack Signatures Description SQL Injection Detect and block SQL injection attempts. XSS Detect and prevent Cross-Site Scripting attacks. CSRF Protect against Cross-Site Request Forgery.
Modify File Type Enforcement:
- Navigate to File Types: I go to ‘Security’ > ‘Application Security’ > ‘Learning and Blocking Settings’ > ‘File Types’.
- Update Allowed File Types: I add or remove file types that should be allowed or blocked.
- Set Enforcement: I set the enforcement actions (block, alert, etc.) for each file type.
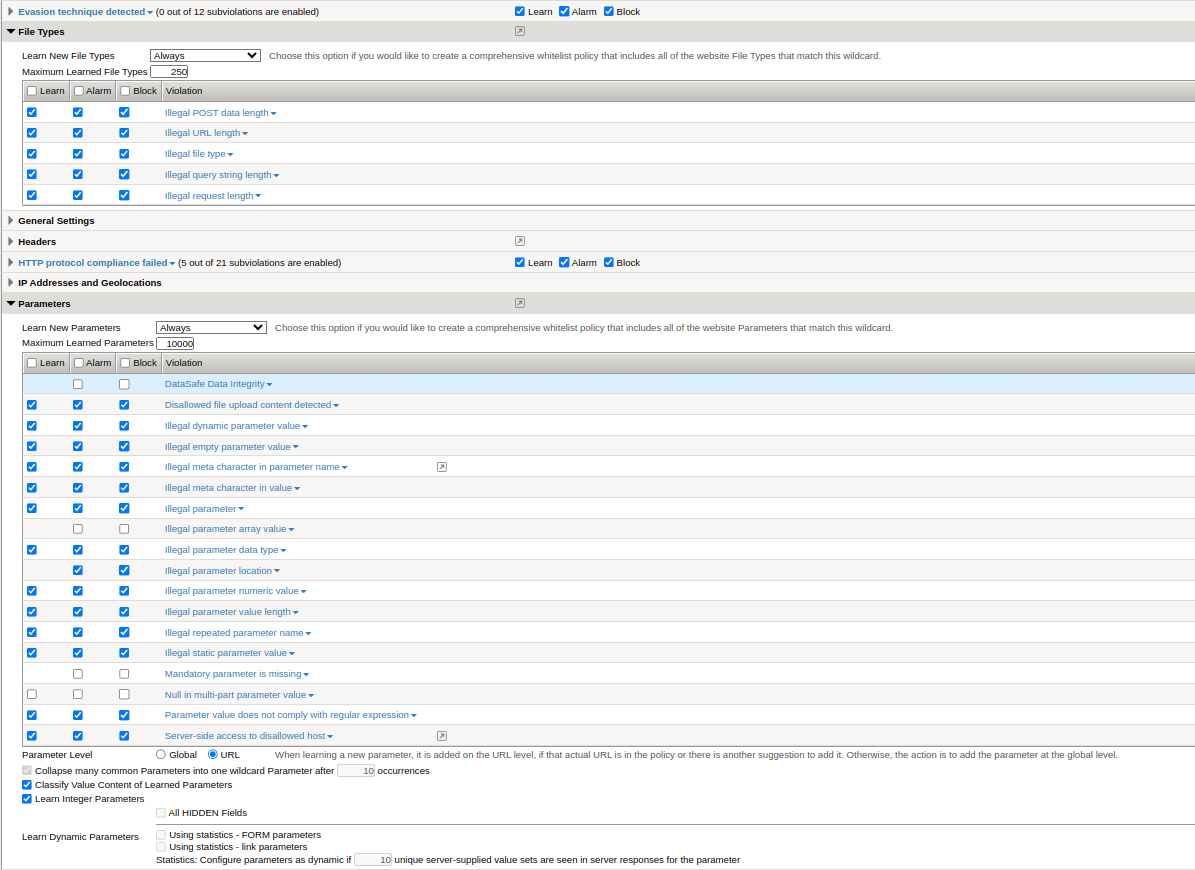
Adjust Parameter Enforcement:
- Navigate to Parameters: I go to ‘Security’ > ‘Application Security’ > ‘Learning and Blocking Settings’ > ‘Parameters’.
- Review and Update Parameters: I review the list of parameters and update their rules (e.g., allowed characters, length, etc.).
- Set Enforcement: I configure the enforcement actions for each parameter.
Parameter Name Allowed Characters Max Length Enforcement username Alphanumeric 30 Block email Alphanumeric + @ . 50 Alert id Numeric 10 Block Save and Apply Changes:
- I save the changes and apply the updated policy to the relevant web application.
- I monitor the logs to ensure the updates are functioning as expected.
Automatic Policy Building
Automatic policy building leverages machine learning and behavioral analysis to update the security policy based on observed traffic patterns. Here’s how I update a security policy automatically:
Steps to Update a Security Policy Automatically
Enable Learning Mode:
- I go to the ‘Security’ tab and select ‘Policies’.
- I choose the policy I want to update and enable learning mode if it’s not already enabled.
Configure Learning Settings:
- Set Learning Parameters: I configure the learning parameters to define what types of traffic and behaviors should be analyzed.
- Duration: I specify the duration for which the system should observe traffic (e.g., one week).
Monitor Traffic:
- I allow the system to monitor and analyze the traffic to learn the normal behavior patterns.
- The system will automatically collect data on common requests, parameters, file types, and user behaviors.
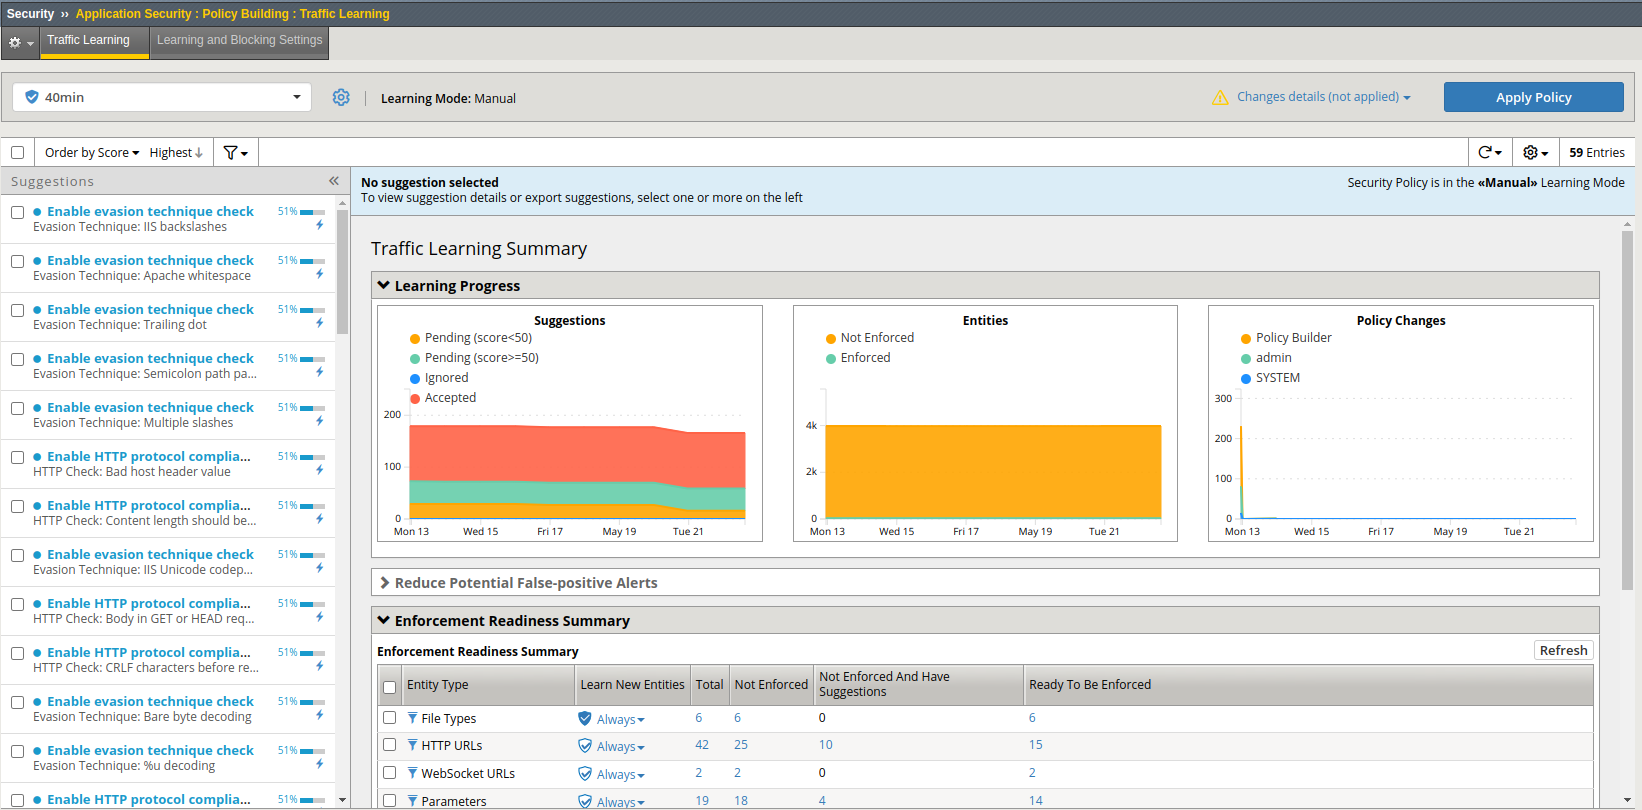
Review Suggestions:
- Access Learning Suggestions: I navigate to ‘Security’ > ‘Application Security’ > ‘Traffic Learning’ > ‘Suggestions’.
- Review and Validate: I review the suggested changes based on the observed traffic. These suggestions might include adding new parameters, updating attack signatures, or modifying enforcement actions.
Apply Suggested Changes:
- Select Suggestions: I select the suggestions I want to apply to the policy.
- Apply: I apply the selected suggestions to the policy.
Enforcement Mode:
- Once the policy has been updated and I am satisfied with the changes, I switch the policy to “Blocking” mode to start enforcing the new rules.
Monitor and Adjust:
- I monitor the traffic and logs to ensure the policy updates are effective.
- I make further adjustments as necessary based on the ongoing traffic analysis.
Comparison of Manual vs Automatic Policy Building
| Feature | Manual Policy Building | Automatic Policy Building |
|---|---|---|
| Control | High, detailed configuration | Medium, based on system suggestions |
| Time Required | High, involves detailed manual configuration | Low, relies on automated suggestions |
| Customization | High, very customizable | Moderate, less granular customization |
| Ease of Use | Requires deep knowledge of security settings | Easier, suitable for those with less in-depth knowledge |
| Adaptability | Manual adjustments needed for changing traffic patterns | Automatically adapts to changing traffic patterns |
By using these methods, I can ensure that my web application security policies are up-to-date and provide robust protection against evolving threats.
3. Protecting Against Common Web Application vulnerabilities
3.1 Cross-Site Scripting (XSS)
Cross-Site Scripting (XSS) is a common web application vulnerability that can lead to serious security issues. In this section, I will cover the definition and examples of XSS and how I can block these attacks using F5 BIG-IP Advanced WAF.
Definition and Examples
What is Cross-Site Scripting (XSS)?
Cross-Site Scripting (XSS) is a prevalent web application vulnerability that allows attackers to inject malicious scripts into web pages viewed by other users. These scripts can hijack user sessions, steal sensitive information, or deface websites. Blocking XSS attacks is crucial for maintaining the integrity and security of web applications.
Types of XSS
- Stored XSS: The malicious script is permanently stored on the target server, such as in a database, comment field, or message board.
- Reflected XSS: The malicious script is reflected off a web server, such as in an error message, search result, or other response that includes some or all of the input sent to the server.
- DOM-Based XSS: The vulnerability exists in client-side code rather than server-side code. The malicious script is executed as a result of modifying the DOM “environment” in the victim’s browser.
Examples of XSS
Example 1: Stored XSS
An attacker submits a malicious script in a comment field of a blog. When other users visit the page, the script executes in their browsers, potentially stealing their cookies and session information.
<script>
  alert("XSS Attack!");
</script>

Example 2: Reflected XSS
An attacker sends a crafted URL to a user. When the user clicks the link, the server reflects the attacker’s script back to the user’s browser, which then executes it.
http://example.com/search?q=
<script>
  alert("XSS Attack!");
</script>
Example 3: DOM-Based XSS
An attacker manipulates the URL to include a malicious script, which the client-side code then processes and executes.
document.write("Hello " + window.location.href.split("=")[1]);
Blocking XSS Attacks
Blocking XSS attacks involves setting up the right security policies and configurations in F5 BIG-IP Advanced WAF. Here’s how I do it:
Steps to Block XSS Attacks
Enable XSS Protection:
- In the BIG-IP management interface, I go to ‘Security’ > ‘Application Security’ > ‘Policies’.
- I select the security policy I want to update.
Configure Attack Signatures:
- Navigate to Attack Signatures: I go to ‘Security’ > ‘Application Security’ > ‘Attack Signatures’.
- Enable XSS Signatures: I enable signatures specifically designed to detect and block XSS attacks.
Signature Name Description XSS Attack Detects general XSS attack patterns. XSS in URL Parameters Detects XSS payloads in URL parameters. XSS in Form Inputs Detects XSS payloads in form inputs. Set Up Input Validation:
- Navigate to Parameters: I go to ‘Security’ > ‘Application Security’ > ‘Parameters’.
- Add Parameter Rules: I add rules for input validation, specifying allowed characters and patterns for parameters that might be vulnerable to XSS.
Parameter Name Allowed Characters Validation Pattern Enforcement username Alphanumeric ^[a-zA-Z0-9]+$ Block comment Alphanumeric + Symbols ^[a-zA-Z0-9\s.,!?]*$ Alert search Alphanumeric ^[a-zA-Z0-9\s]+$ Block Output Encoding:
- I ensure that all data output to web pages is properly encoded to prevent execution of injected scripts.
- This involves setting up the server and client-side code to use secure output encoding functions.
Content Security Policy (CSP):
- Set Up CSP: I configure a Content Security Policy to restrict the sources from which scripts can be loaded.
- Add CSP Header: I add the CSP header to the server responses.
Content-Security-Policy: default-src 'self'; script-src 'self'; object-src 'none';Apply and Monitor:
- I apply these configurations and monitor the logs to ensure that XSS attacks are being detected and blocked effectively.
- I regularly review and update the policies as needed based on new threats and patterns.
By following these steps, I can effectively block XSS attacks and protect my web application from one of the most common web vulnerabilities.
3.2 SQL Injection
SQL Injection is a critical security vulnerability that can have devastating consequences for web applications. Here’s an in-depth look at SQL Injection, along with strategies for blocking these attacks.
Definition and Examples
What is SQL Injection?
SQL Injection is a type of attack where malicious SQL code is inserted into input fields of a web application, allowing attackers to manipulate the database and potentially gain unauthorized access to sensitive information. Blocking SQL Injection attacks is essential for preventing data breaches and protecting the confidentiality of user data.
Types of SQL Injection
- In-band SQLi: The attacker uses the same communication channel to both launch the attack and gather results. It includes techniques like error-based and union-based SQLi.
- Inferential SQLi: The attacker sends payloads and observes the behavior and responses of the server to deduce information. It includes blind SQLi and time-based blind SQLi.
- Out-of-band SQLi: The attacker uses different communication channels to send the attack and collect data. This is less common and relies on certain features being enabled on the database server.
Examples of SQL Injection
Example 1: Basic SQL Injection
An attacker enters 1' OR '1'='1'# in a login form. If the application concatenates this input directly into an SQL query, it might become:
SELECT * FROM users WHERE username = '1' OR '1'='1' # ' AND password = '';
This query is always true and may return all user records.
Example 2: Union-based SQL Injection
An attacker enters a payload like , and 1=0 union select null, concat(first_name, 0x0a, lastname, 0x0a, user, 0x0a, password) from users # which is designed to exploit a vulnerability in a web application’s database query to retrieve sensitive information from the users table.
The primary purpose of this SQL injection is to extract and display sensitive information from the users table. Specifically, it aims to concatenate and display the first names, last names, usernames, and passwords of all users in the table, separated by newlines.
Basic Structure:
- The payload starts with
, and 1=0. This part attempts to make the initial condition false (1=0is always false) to force the application to rely on theUNION SELECTpart of the query.
- The payload starts with
UNION SELECT:
union select null, concat(first_name, 0x0a, lastname, 0x0a, user, 0x0a, password) from users #is used to combine the results of the existing query with the results of the injected query.
Concat Function:
concat(first_name, 0x0a, lastname, 0x0a, user, 0x0a, password)combines the values from the specified columns of theuserstable. The0x0arepresents a newline character (ASCII Line Feed), which means the values will be concatenated with a newline between each field.first_nameis the first name of the user.lastnameis the last name of the user.useris the username.passwordis the password.
Null Placeholder:
nullis used as a placeholder for the first column in theUNION SELECTclause. This is because the number of columns in theUNION SELECTmust match the number of columns in the original query. Since the original query likely selects multiple columns,nullfills the gap for one of the columns.
Comment Symbol:
#is a comment symbol in SQL. Everything after#is ignored by the SQL parser, ensuring that the rest of the original query is not executed.
Here if the original query is something like this:
SELECT id, name FROM products WHERE category_id = 1;
After injection, it might become:
SELECT id, name FROM products WHERE category_id = 1 AND 1=0 UNION SELECT null, concat(first_name, 0x0a, lastname, 0x0a, user, 0x0a, password) FROM users;
Since 1=0 is always false, the WHERE clause will effectively discard the original query results. The UNION SELECT clause then retrieves and displays the concatenated first_name, lastname, user, and password from the users table.

Blocking SQL Injection Attacks
To block SQL Injection attacks using F5 BIG-IP Advanced WAF, I follow these steps:
Steps to Block SQL Injection Attacks
Enable SQL Injection Protection:
- I navigate to ‘Security’ > ‘Application Security’ > ‘Policies’.
- I select the security policy I want to update.
Configure Attack Signatures:
- Navigate to Attack Signatures: I go to ‘Security’ > ‘Application Security’ > ‘Attack Signatures’.
- Enable SQLi Signatures: I enable signatures specifically designed to detect and block SQL Injection attacks.
Signature Name Description SQL Injection Detects common SQL injection patterns. SQLi in URL Parameters Detects SQLi payloads in URL parameters. SQLi in Form Inputs Detects SQLi payloads in form inputs. Set Up Parameter Validation:
- Navigate to Parameters: I go to ‘Security’ > ‘Application Security’ > ‘Parameters’.
- Add Parameter Rules: I add rules for input validation, specifying allowed characters and patterns for parameters that might be vulnerable to SQL Injection.
Parameter Name Allowed Characters Validation Pattern Enforcement username Alphanumeric ^[a-zA-Z0-9]+$ Block comment Alphanumeric + Symbols ^[a-zA-Z0-9\s.,!?]*$ Alert id Numeric ^[0-9]+$ Block Use Prepared Statements and Parameterized Queries:
- Ensure that the application code uses prepared statements and parameterized queries, which separate SQL code from data.
Apply and Monitor:
- I apply these configurations and monitor the logs to ensure that SQL Injection attacks are being detected and blocked effectively.
- I regularly review and update the policies as needed based on new threats and patterns.
3.3 Cross-Site Request Forgery (CSRF)
Cross-Site Request Forgery (CSRF) is another serious web application vulnerability. In this section, I’ll define CSRF and explain how to protect against it using F5 BIG-IP Advanced WAF.
Definition and Examples
What is Cross-Site Request Forgery (CSRF)?
Cross-Site Request Forgery (CSRF) is a security vulnerability that allows attackers to trick users into performing actions on a web application without their consent. By exploiting CSRF vulnerabilities, attackers can perform unauthorized transactions, change user settings, or perform other malicious actions on behalf of the victim. Using CSRF protection mechanisms is vital for preventing these attacks and ensuring the integrity of user interactions with web applications.
How CSRF Works
An attacker tricks the victim into submitting a malicious request, typically by embedding a link or script in an email or on another website. When the user clicks the link or loads the script, the request is sent to the target web application with the user’s credentials.
Examples of CSRF
Example 1: Changing Email Address
An attacker crafts a malicious URL that changes the victim’s email address:
<a href="http://example.com/[email protected]"
  >Click here</a
>
If the victim clicks the link while logged into the target site, their email address is changed without their consent.
Example 2: Transferring Funds
An attacker creates a form that submits a fund transfer request:
<form action="http://bank.com/transfer" method="POST">
  <input type="hidden" name="amount" value="1000" />
  <input type="hidden" name="to_account" value="attacker_account" />
  <input type="submit" value="Click to win a prize!" />
</form>
If the user is logged into their bank account and submits the form, the funds are transferred to the attacker’s account.
Using CSRF Protection
To protect against CSRF attacks using F5 BIG-IP Advanced WAF, I follow these steps:
Steps to Use CSRF Protection
Enable CSRF Protection:
- In the BIG-IP management interface, I go to ‘Security’ > ‘Application Security’ > ‘Policies’.
- I select the security policy I want to update.
Configure CSRF Protection:
- Navigate to CSRF Protection: I go to ‘Security’ > ‘Application Security’ > ‘CSRF Protection’.
- Enable CSRF Protection: I enable the CSRF protection feature.
Set Up CSRF Tokens:
- Configure Tokens: I configure the system to include CSRF tokens in forms and AJAX requests.
- Token Validation: Ensure that the application validates the CSRF tokens with each request.
Feature Description CSRF Token Inclusion Add CSRF tokens to all forms and AJAX requests. Token Validation Ensure tokens are validated on the server side. Implement SameSite Cookies:
- I configure the application to use SameSite cookies, which restricts cookies from being sent along with cross-site requests.
- Set SameSite Attribute: I set the
SameSiteattribute of cookies toStrictorLax.
Monitor and Review:
- I apply these configurations and monitor the logs to ensure that CSRF attacks are being detected and blocked effectively.
- I regularly review and update the policies as needed based on new threats and patterns.
3.4 Cookie Security
Cookies are essential for session management and user tracking. Protecting cookies from modification and hijacking is crucial for web application security. Here’s how I manage cookie security using F5 BIG-IP Advanced WAF.
Defination
Cookies are used to store session information and user preferences, making them a target for attackers seeking to hijack user sessions or steal sensitive data. Preventing cookie modification and implementing session cookie hijacking protection are essential measures for safeguarding user sessions and maintaining the security of web applications.
A. Preventing Cookie Modification
Preventing unauthorized modification of cookies is important to maintain session integrity and security.
Steps to Prevent Cookie Modification
Enable Cookie Protection:
- In the BIG-IP management interface, I go to ‘Security’ > ‘Application Security’ > ‘Policies’.
- I select the security policy I want to update.
Configure Cookie Security:
- Navigate to Cookie Security: I go to ‘Security’ > ‘Application Security’ > ‘Cookie Security’.
- Enable Cookie Protection: I enable the cookie protection feature.
Set HTTPOnly and Secure Flags:
- HTTPOnly Flag: I ensure that the HTTPOnly flag is set for all session cookies to prevent access via client-side scripts.
- Secure Flag: I ensure that the Secure flag is set to ensure cookies are only sent over HTTPS.
| Cookie Attribute | Description |
|---|---|
| HTTPOnly | Prevents access to cookies via JavaScript. |
| Secure | Ensures cookies are only sent over HTTPS. |
Implement Cookie Integrity:
- Cookie Signing: I configure the system to sign cookies to detect and prevent tampering.
- Cookie Encryption: I enable encryption for cookies containing sensitive information.
Monitor and Review:
- I apply these configurations and monitor the logs to ensure that cookie modification attempts are being detected and blocked.
- I regularly review and update the policies as needed.
B. Session Cookie Hijacking Protection
Protecting session cookies from hijacking is essential for maintaining secure user sessions.
Steps to Protect Against Session Cookie Hijacking
Enable Session Protection:
- In the BIG-IP management interface, I go to ‘Security’ > ‘Application Security’ > ‘Policies’.
- I select the security policy I want to update.
Configure Session Handling:
- Navigate to Session Handling: I go to ‘Security’ > ‘Application Security’ > ‘Session Handling’.
- Enable Session Protection: I enable the session protection feature.
Set Up Session Timeout:
- Configure Timeouts: I configure session timeouts to minimize the risk of session hijacking.
- Idle Timeout: Set an idle timeout to end sessions after a period of inactivity.
- Absolute Timeout: Set an absolute timeout to end sessions after a fixed duration.
Timeout Type Description Idle Timeout Ends sessions after a period of inactivity. Absolute Timeout Ends sessions after a fixed duration. Implement IP and Device Binding:
- IP Binding: Bind sessions to the user’s IP address to prevent session hijacking from different locations.
- Device Binding: Bind sessions to specific devices to enhance security.
Monitor and Review:
- I apply these configurations and monitor the logs to ensure that session hijacking attempts are being detected and blocked.
- I regularly review and update the policies as needed.
By understanding and implementing these security measures, I can significantly reduce the risk of SQL Injection, CSRF, and cookie-related attacks on my web applications.
4. Data Security and Compliance
4.1 PCI DSS Compliance
Using Data Guard
Ensuring PCI DSS compliance is critical for organizations that handle payment card information. F5 BIG-IP Advanced WAF helps achieve this by using Data Guard to prevent sensitive data leakage.
Steps to Use Data Guard:
Enable Data Guard:
- Navigate to
Security>Application Security>Data Guard. - Enable the Data Guard feature.
- Navigate to
Configure Sensitive Data Patterns:
- Add patterns for sensitive data that need to be protected (e.g., credit card numbers, Social Security numbers).
- Use regular expressions to define these patterns accurately.
Pattern Description \d{16} Matches 16-digit credit card numbers \d{3}-\d{2}-\d{4} Matches Social Security numbers (SSNs) Set Masking Rules:
- Define how sensitive data should be masked in logs and application responses.
- For example, replace digits with
X(e.g.,XXXXXXXXXXXX1234).
Apply Data Guard to Security Policies:
- Assign the Data Guard configuration to your security policies.
- This ensures all traffic passing through the WAF is inspected for sensitive data patterns.
Monitor and Review:
- Regularly review the logs to ensure sensitive data is being properly masked.
- Update the patterns and masking rules as needed to adapt to new data formats or compliance requirements.
Custom Data Guard Patterns
Creating custom Data Guard patterns allows me to tailor the data protection to specific needs and compliance requirements.
Steps to Create Custom Data Guard Patterns:
Identify Custom Data Requirements:
- Determine the types of custom sensitive data that need protection (e.g., employee IDs, custom account numbers).
Define Regular Expressions:
- Use regular expressions to define patterns for the custom sensitive data.
Custom Pattern Description \d{8}-\d{4} Matches custom account numbers EMP-\d{5} Matches employee IDs Configure Data Guard:
- Navigate to
Security>Application Security>Data Guard. - Add the custom patterns to the Data Guard configuration.
- Navigate to
Set Masking Rules for Custom Patterns:
- Define how these custom data types should be masked (e.g.,
XXXX-1234for custom account numbers).
- Define how these custom data types should be masked (e.g.,
Apply and Monitor:
- Apply the updated Data Guard configuration to the security policies.
- Monitor logs to ensure custom data is being masked correctly and adjust patterns as needed.
4.2 Logging and Reporting
Security Policy Logging
Logging is a critical component of any security strategy. It provides visibility into the security events and helps in auditing and forensic analysis.
Steps to Configure Security Policy Logging:
Enable Logging:
- Navigate to
Security>Event Logs>Application. - Enable logging for security policies.
- Navigate to
Select Log Destination:
- Choose where the logs should be sent (e.g., local storage, remote syslog server).
- Configure the log destination settings.
Define Log Levels:
- Specify the level of detail to be logged (e.g., Info, Warning, Error).
- More detailed logs provide better insights but require more storage.
Log Level Description Info Basic information about events Warning Potential issues that need attention Error Critical issues that require immediate action Configure Log Filters:
- Set filters to log specific types of events or data (e.g., only log SQL injection attempts).
- This helps in focusing on critical events.
Apply Logging Configuration:
- Save and apply the logging settings to the security policies.
- Ensure the logs are being generated and sent to the configured destination.
Regular Review and Analysis:
- Regularly review the logs to identify potential security incidents.
- Analyze the logs to understand trends and improve security policies.
Reporting Features
Reporting features in F5 BIG-IP Advanced WAF provide insights into the security posture of web applications. These reports help in understanding the effectiveness of security policies and in compliance reporting.
Steps to Use Reporting Features:
Access Reporting Module:
- Navigate to
Security>Event Logs>Reports. - Access the reporting module to generate various reports.
- Navigate to
Select Report Type:
- Choose the type of report needed (e.g., attack statistics, policy violations, compliance reports).
Report Type Description Attack Statistics Provides data on different types of attacks detected Policy Violations Details violations of security policies Compliance Reports Helps in demonstrating compliance with standards Customize Report Parameters:
- Specify the time range, filter criteria, and other parameters for the report.
- Customize the report to focus on specific areas of interest.
Generate Report:
- Click on the generate button to create the report.
- Review the report to gain insights into security events and trends.
Export and Share Reports:
- Export the report in preferred formats (e.g., PDF, CSV).
- Share the reports with stakeholders for review and action.
Regular Reporting:
- Schedule regular reports to stay updated on the security status.
- Use the reports to make informed decisions on improving security policies.
By following these steps, I can ensure that my organization maintains robust data security and compliance, with comprehensive logging and reporting to support ongoing security management and regulatory requirements.
5. Policy Enforcement Features
5.1 File Type Enforcement
Enforcing File Types
Enforcing file types in F5 BIG-IP Advanced WAF ensures that only permitted file types are uploaded or accessed through the web application. This helps in preventing attacks that exploit vulnerabilities in file handling.
Steps to Enforce File Types:
Navigate to Security Policies:
- Go to
Security>Application Security>Policy.
- Go to
Select the Security Policy:
- Choose the security policy you want to modify.
Configure File Types:
- Go to the
File Typessection. - Add allowed file types (e.g.,
.jpg,.png,.pdf).
File Type Description .jpg JPEG Image File .png PNG Image File .pdf PDF Document - Go to the
Set Enforcement Actions:
- Define actions for non-compliant file types (e.g., block, log, alert).
Apply Changes:
- Save and apply the changes to the security policy.
Monitor and Review:
- Monitor logs to ensure the policy is enforced correctly.
- Adjust file type settings as needed.
Global Settings for File Types
Global settings for file types allow me to define file type enforcement rules that apply across multiple security policies.
Steps to Configure Global Settings:
Access Global Settings:
- Go to
Security>Application Security>Policy>File Types.
- Go to
Add Global File Types:
- Define file types that should be allowed or blocked globally.
Configure Actions:
- Set default actions for file types (e.g., block, log, alert).
File Type Global Action .exe Block .docx Allow Apply Global Settings:
- Save and apply the global settings.
- These settings will now be inherited by individual security policies.
Monitor Enforcement:
- Check logs to ensure global settings are being enforced.
- Update settings based on monitoring results.
File Type Learning and Enforcement
File type learning allows the WAF to dynamically learn and enforce file types based on observed traffic patterns.
Steps to Enable File Type Learning:
Enable Learning Mode:
- Navigate to
Security>Application Security>Policy>Learning and Blocking.
- Navigate to
Set Learning Parameters:
- Configure parameters for learning file types (e.g., time window, traffic volume).
Review Learned File Types:
- Periodically review the file types that the WAF has learned.
- Decide which learned file types to enforce.
Update Security Policy:
- Add the learned file types to the security policy.
- Define actions for each file type.
File Type Learning Status Action .xml Learned Allow .sh Learned Block Monitor and Adjust:
- Continuously monitor logs and adjust the file type enforcement as needed.
5.2 Parameter Enforcement
Enforcing Parameters
Parameter enforcement ensures that only expected parameters are accepted by the web application, protecting against parameter manipulation attacks.
Steps to Enforce Parameters:
Navigate to Security Policies:
- Go to
Security>Application Security>Policy.
- Go to
Select the Security Policy:
- Choose the security policy to configure.
Configure Parameters:
- Go to the
Parameterssection. - Define allowed parameters (e.g.,
username,password,email).
Parameter Description username User’s login name password User’s password email User’s email address - Go to the
Set Enforcement Actions:
- Specify actions for unexpected parameters (e.g., block, log, alert).
Apply Changes:
- Save and apply the changes to the security policy.
Monitor and Review:
- Monitor logs to ensure parameter enforcement is working correctly.
- Adjust parameter settings as needed.
Global Settings for Parameters
Global settings for parameters allow me to define enforcement rules that apply across multiple security policies.
Steps to Configure Global Settings:
Access Global Settings:
- Go to
Security>Application Security>Policy>Parameters.
- Go to
Add Global Parameters:
- Define parameters that should be allowed or blocked globally.
Configure Actions:
- Set default actions for parameters (e.g., block, log, alert).
Parameter Global Action sessionID Allow debug Block Apply Global Settings:
- Save and apply the global settings.
- These settings will now be inherited by individual security policies.
Monitor Enforcement:
- Check logs to ensure global settings are being enforced.
- Update settings based on monitoring results.
Parameter Learning and Enforcement
Parameter learning allows the WAF to dynamically learn and enforce parameters based on observed traffic patterns.
Steps to Enable Parameter Learning:
Enable Learning Mode:
- Navigate to
Security>Application Security>Policy>Learning and Blocking.
- Navigate to
Set Learning Parameters:
- Configure parameters for learning (e.g., time window, traffic volume).
Review Learned Parameters:
- Periodically review the parameters that the WAF has learned.
- Decide which learned parameters to enforce.
Update Security Policy:
- Add the learned parameters to the security policy.
- Define actions for each parameter.
Parameter Learning Status Action token Learned Allow debug Learned Block Monitor and Adjust:
- Continuously monitor logs and adjust the parameter enforcement as needed.
Different Parameter Types
Different parameter types (e.g., query parameters, form parameters) can be enforced to ensure only expected data is processed by the application.
Steps to Enforce Different Parameter Types:
Identify Parameter Types:
- Determine the types of parameters used by the application (e.g., query, form, cookie).
Configure Parameter Types:
- Go to
Security>Application Security>Policy>Parameters. - Define the expected parameter types.
Parameter Type Description query URL query parameters form Form submission parameters cookie Cookies sent by the browser - Go to
Set Enforcement Actions:
- Specify actions for each parameter type (e.g., block unexpected types).
Apply Changes:
- Save and apply the changes to the security policy.
Monitor and Review:
- Monitor logs to ensure parameter type enforcement is working correctly.
- Adjust parameter type settings as needed.
Blocking Parameter Tampering
Blocking parameter tampering prevents attackers from manipulating parameters to exploit the application.
Steps to Block Parameter Tampering:
Enable Parameter Enforcement:
- Ensure parameter enforcement is enabled in the security policy.
Configure Parameter Validation:
- Define validation rules for parameters (e.g., length, format, value range).
Set Enforcement Actions:
- Specify actions for tampered parameters (e.g., block, log, alert).
Parameter Validation Rule Action username Length: 5-20 characters Block age Value range: 1-120 Block Apply Changes:
- Save and apply the changes to the security policy.
Monitor and Review:
- Monitor logs to ensure parameter tampering is being blocked.
- Adjust validation rules as needed.
5.3 Entity Enforcement
Understanding Entity Enforcement
Entity enforcement involves defining and enforcing rules for entities (e.g., users, sessions) to ensure that only legitimate entities can interact with the application.
Steps to Implement Entity Enforcement:
Identify Entities:
- Determine the entities to be enforced (e.g., user accounts, sessions).
Define Entity Rules:
- Go to
Security>Application Security>Policy>Entities. - Define rules for each entity (e.g., user authentication, session validity).
Entity Rule User - Go to
Must be authenticated | | Session | Must be valid and active |
Set Enforcement Actions:
- Specify actions for non-compliant entities (e.g., block, log, alert).
Apply Changes:
- Save and apply the entity rules to the security policy.
Monitor and Review:
- Monitor logs to ensure entity enforcement is working correctly.
- Adjust entity rules as needed.
By enforcing file types, parameters, and entities, I can ensure that my web applications are secure and protected against various attacks. Regular monitoring and adjustments help in maintaining robust security over time.
6. Advanced Attack Protection
6.1 Bot Protection
Using a Bot Defense Profile
Using a bot defense profile helps in identifying and mitigating malicious bot activities, ensuring that only legitimate traffic interacts with the application.
Steps to Use a Bot Defense Profile:
Navigate to Security Policies:
- Go to
Security>Application Security>Bot Defense.
- Go to
Create a New Profile:
- Click on
Createto start a new bot defense profile.
- Click on
Configure Bot Detection:
- Set up detection mechanisms such as CAPTCHA, JavaScript challenges, and behavioral analysis.
Detection Method Description CAPTCHA Present a challenge-response test to detect bots. JavaScript Challenge Require execution of JavaScript to identify bots. Behavioral Analysis Analyze user behavior to detect automated activities. Define Actions for Detected Bots:
- Configure actions such as blocking, logging, or redirecting detected bots.
Apply the Profile to the Security Policy:
- Assign the created bot defense profile to the relevant security policy.
Monitor and Adjust:
- Continuously monitor the logs to ensure the bot defense profile is effective.
- Adjust detection methods and actions based on monitoring results.
Blocking Suspicious Browsers
Blocking suspicious browsers involves identifying and preventing access from browsers commonly used by malicious bots.
Steps to Block Suspicious Browsers:
Access Bot Defense Configuration:
- Navigate to
Security>Application Security>Bot Defense.
- Navigate to
Configure Browser Blocking:
- Enable the option to block suspicious browsers.
- Define criteria for what constitutes a suspicious browser (e.g., outdated versions, known bot browsers).
Set Actions for Suspicious Browsers:
- Specify actions such as blocking access, presenting CAPTCHA, or logging the event.
Browser Criteria Action Outdated Browsers Versions older than X Block Known Bot Browsers Specific bot signatures Present CAPTCHA Apply the Configuration:
- Save and apply the changes to the bot defense profile.
Monitor Browser Activity:
- Continuously monitor logs to identify any false positives.
- Adjust the criteria and actions as necessary.
6.2 Denial of Service (DoS) Protection
Layer 7 DoS Protection
Layer 7 DoS protection focuses on mitigating attacks targeting the application layer, ensuring the application remains available during an attack.
Steps to Implement Layer 7 DoS Protection:
Navigate to DoS Protection Settings:
- Go to
Security>DoS Protection.
- Go to
Create a DoS Profile:
- Click on
Createto start a new DoS protection profile.
- Click on
Configure Detection Methods:
- Set up detection mechanisms such as anomaly detection, rate limiting, and signature-based detection.
Detection Method Description Anomaly Detection Identify unusual traffic patterns. Rate Limiting Limit the number of requests per second from a source. Signature-Based Detection Detect known attack signatures. Define Mitigation Actions:
- Configure actions such as blocking, rate limiting, or redirecting traffic.
Apply the DoS Profile to the Security Policy:
- Assign the created DoS profile to the relevant security policy.
Monitor and Adjust:
- Continuously monitor the logs to ensure the DoS protection is effective.
- Adjust detection methods and actions based on monitoring results.
Behavioral Layer 7 DoS Protection
Behavioral Layer 7 DoS protection involves analyzing traffic patterns to detect and mitigate sophisticated DoS attacks.
Steps to Implement Behavioral Layer 7 DoS Protection:
Enable Behavioral Analysis:
- Navigate to
Security>DoS Protection>Behavioral Analysis.
- Navigate to
Configure Traffic Baseline:
- Set up a baseline for normal traffic behavior by monitoring regular traffic patterns.
Define Detection Criteria:
- Configure criteria for detecting deviations from the baseline (e.g., sudden spikes in traffic).
Detection Criteria Description Traffic Volume Spikes Identify sudden increases in request volume. Session Anomalies Detect unusual session behavior (e.g., session hijacking). Set Mitigation Actions:
- Specify actions such as blocking, rate limiting, or redirecting anomalous traffic.
Apply the Configuration:
- Save and apply the behavioral analysis settings to the DoS protection profile.
Monitor and Adjust:
- Continuously monitor traffic patterns and logs to ensure effective protection.
- Adjust the baseline and detection criteria as needed.
By implementing these advanced attack protection features, I can significantly enhance the security of my web applications. Continuous monitoring and adjustments ensure that the protections remain effective against evolving threats.
6.3 Brute Force Attack Protection
Single Username Attacks
Single username attacks target a single user account by attempting various passwords. Protecting against these attacks is crucial to ensure individual accounts are not compromised.
Steps to Protect Against Single Username Attacks:
Navigate to Brute Force Protection:
- Go to
Security>Application Security>Brute Force Protection.
- Go to
Create a Brute Force Protection Profile:
- Click on
Createto start a new profile.
- Click on
Configure Detection Methods:
- Set thresholds for login attempts and configure detection mechanisms.
Detection Method Description Login Attempt Threshold Define maximum allowed login attempts per username. Time Window Set the time frame for counting login attempts. Define Actions for Detection:
- Configure actions such as blocking the IP, locking the account, or presenting a CAPTCHA after the threshold is exceeded.
Action Description Block IP Block the IP address making excessive login attempts. Lock Account Temporarily lock the account after multiple failed attempts. CAPTCHA Require CAPTCHA verification after a number of failed attempts. Apply the Profile:
- Assign the profile to the relevant security policy.
Monitor and Adjust:
- Continuously monitor logs to ensure effectiveness.
- Adjust thresholds and actions based on the monitoring results.
Multi-Username Attacks
Multi-username attacks involve attempting various usernames with a few common passwords. This type of attack can be more challenging to detect and requires broader protective measures.
Steps to Protect Against Multi-Username Attacks:
Access Brute Force Protection Settings:
- Navigate to
Security>Application Security>Brute Force Protection.
- Navigate to
Create or Edit a Profile:
- Either create a new profile or edit an existing one.
Configure Multi-Username Detection:
- Set thresholds for login attempts across multiple usernames.
Detection Method Description IP Attempt Threshold Define maximum allowed login attempts per IP address. Username Variability Set the detection for multiple usernames from a single IP. Define Mitigation Actions:
- Specify actions such as blocking the IP, presenting a CAPTCHA, or rate limiting.
Action Description Block IP Block the IP address making excessive login attempts. CAPTCHA Require CAPTCHA verification after multiple failed attempts. Rate Limiting Slow down request rate from a specific IP. Apply and Monitor:
- Assign the profile to the security policy and monitor the effectiveness.
- Adjust settings based on the activity logs.
Distributed Brute Force Attacks
Distributed brute force attacks originate from multiple IP addresses, making them harder to detect. Implementing sophisticated detection and response mechanisms is essential to mitigate these attacks.
Steps to Protect Against Distributed Brute Force Attacks:
Navigate to Advanced Protection Settings:
- Go to
Security>Application Security>Advanced Protection.
- Go to
Enable Distributed Brute Force Protection:
- Enable the feature specifically designed for distributed attacks.
Configure Detection Mechanisms:
- Set thresholds and detection methods to identify distributed attempts.
Detection Method Description Distributed IP Detection Identify login attempts from multiple IP addresses. Anomaly Detection Use patterns to detect unusual login behavior. Set Mitigation Actions:
- Configure actions such as blocking offending IP addresses, deploying rate limiting, or requiring additional verification.
Action Description Block IPs Block IP addresses involved in the attack. Rate Limiting Apply rate limiting to reduce the attack impact. Additional Verification Require extra verification steps. Apply Settings and Monitor:
- Assign the settings to the security policy and monitor attack patterns.
- Adjust detection and mitigation strategies based on the analysis.
6.4 Credential Stuffing Attacks
Credential stuffing involves using compromised credentials from one service to gain unauthorized access to another service. This attack can be mitigated by implementing robust detection and response strategies.
Steps to Block Credential Stuffing Attacks:
Navigate to Credential Protection:
- Go to
Security>Application Security>Credential Protection.
- Go to
Enable Credential Stuffing Protection:
- Enable the feature designed to detect and block credential stuffing attempts.
Configure Detection Mechanisms:
- Set parameters for identifying credential stuffing activities, such as rapid login attempts using multiple credentials.
Detection Method Description Login Velocity Detect high-frequency login attempts. Credential Reuse Identify use of the same credentials across multiple accounts. Define Mitigation Actions:
- Specify actions such as blocking IPs, requiring CAPTCHA, or initiating multi-factor authentication (MFA).
Action Description Block IP Block IP addresses associated with credential stuffing. CAPTCHA Require CAPTCHA to verify human interaction. Multi-Factor Authentication Enforce MFA to add an additional security layer. Apply the Protection Profile:
- Assign the protection profile to the relevant security policy.
Monitor and Adapt:
- Continuously monitor login attempts and credential usage.
- Adapt detection and mitigation strategies based on observed patterns.
By implementing these brute force and credential stuffing attack protections, I can significantly enhance the security of user accounts and ensure the integrity of my web applications. Continuous monitoring and adaptive strategies are crucial to maintaining robust security against evolving threats.
7.1 Attack Signatures
Using and Enforcing Attack Signatures
Attack signatures are predefined patterns that identify malicious activity. They play a crucial role in detecting and preventing various attacks by recognizing these patterns in network traffic.
Steps to Use and Enforce Attack Signatures:
Access the Attack Signatures Settings:
- Navigate to
Security>Application Security>Attack Signatures.
- Navigate to
Enable Attack Signatures:
- Ensure the attack signatures are enabled for your security policy.
Select Signature Sets:
- Choose the relevant attack signature sets to apply based on the application type.
Signature Set Description General Covers a wide range of common attacks. SQL Injection Specifically targets SQL injection patterns. XSS Focuses on detecting Cross-Site Scripting attacks. Configure Signature Enforcement:
- Define the enforcement mode (blocking, detection only, etc.).
Enforcement Mode Description Blocking Actively blocks detected attacks. Detection Only Logs the attacks without blocking. Apply the Settings:
- Save and apply the configured attack signatures to the security policy.
Monitor and Update:
- Regularly monitor the logs for detected attacks.
- Update the signature sets to stay current with emerging threats.
Custom Attack Signatures
Creating custom attack signatures allows me to define specific patterns unique to my application or environment, enhancing security by addressing threats that predefined signatures might miss.
Steps to Create and Apply Custom Attack Signatures:
Navigate to Custom Signatures:
- Go to
Security>Application Security>Attack Signatures.
- Go to
Create a New Signature:
- Click on
Createto define a new custom signature.
- Click on
Define Signature Details:
- Fill in the necessary details such as name, description, and signature pattern.
Field Description Name Unique name for the signature. Description Brief description of the signature purpose. Signature Pattern The pattern or regex that defines the attack. Set the Action:
- Specify the action to take when the signature is matched (e.g., block, log).
Apply the Custom Signature:
- Assign the custom signature to the relevant security policy.
Test and Monitor:
- Test the custom signature to ensure it works correctly.
- Monitor the logs to see the custom signature in action.
7.2 Violation Detection
Detection by Username
Detecting violations by username helps to identify malicious activities linked to specific user accounts, such as repeated login failures or suspicious actions.
Steps to Detect Violations by Username:
Access Violation Detection Settings:
- Navigate to
Security>Application Security>Violations.
- Navigate to
Enable Username Tracking:
- Ensure that the security policy is configured to track violations by username.
Define Violation Criteria:
- Set the criteria for what constitutes a violation (e.g., failed logins, policy breaches).
Violation Type Description Failed Login Attempts Track repeated failed login attempts. Policy Breach Detect actions that violate security policies. Set Response Actions:
- Configure actions to take when a violation is detected (e.g., alert, block user).
Action Description Alert Send an alert to the admin or security team. Block User Temporarily block the user account. Apply and Monitor:
- Apply the settings to the security policy.
- Continuously monitor the logs for any violations linked to usernames.
Detection by Device
Detecting violations by device helps identify and respond to malicious activities originating from specific devices, enhancing security by addressing device-specific threats.
Steps to Detect Violations by Device:
Access Device Detection Settings:
- Navigate to
Security>Application Security>Violations.
- Navigate to
Enable Device Tracking:
- Ensure that the security policy includes device tracking capabilities.
Define Violation Criteria:
- Set the criteria for device-related violations (e.g., repeated access attempts from an unknown device).
Violation Type Description Unknown Device Access Track attempts from devices not previously recognized. Repeated Access Attempts Detect repeated access attempts from a single device. Set Response Actions:
- Configure actions for detected device violations (e.g., block device, notify admin).
Action Description Block Device Block the device from accessing the application. Notify Admin Send a notification to the administrator. Apply and Monitor:
- Apply the device detection settings to the security policy.
- Monitor device activity logs to detect and respond to violations.
By leveraging attack signatures and implementing robust violation detection mechanisms, I can significantly enhance the security posture of my web applications, ensuring proactive and responsive threat management. Regular updates and continuous monitoring are essential to maintain effective protection against evolving threats.
8. Session Management and Protection
8.1 Login Page Enforcement
Using Login Page Enforcement
Login page enforcement is crucial for ensuring that only authenticated users can access sensitive areas of my web application. By enforcing login page security, I protect against unauthorized access and potential brute force attacks.
Steps to Implement Login Page Enforcement:
Access the Security Policy Settings:
- Navigate to
Security>Application Security>Login Pages.
- Navigate to
Define the Login Page:
- Specify the URL of the login page.
Field Description Login Page URL The exact URL where the login form is located. Login Parameters Parameters like username and password fields. Set Authentication Criteria:
- Define what constitutes successful authentication (e.g., a successful login response).
Criteria Description Successful Login Indicator A pattern or status code indicating a successful login (e.g., HTTP 200). Enable Enforcement:
- Ensure that the login page enforcement is enabled in the security policy.
Enforcement Option Description Enable Turn on the enforcement for the specified login page. Configure Response Actions:
- Define the actions to take on failed login attempts (e.g., block IP after multiple failures).
Response Action Description Block IP Block the IP address after a set number of failed attempts. Alert Admin Send an alert to the administrator. Apply and Monitor:
- Save the settings and monitor login attempts through the security logs.
8.2 Session Protection
Session Cookie Hijacking Protection
Session cookie hijacking involves an attacker stealing a user’s session cookie to gain unauthorized access to their account. Protecting session cookies is essential to maintain the integrity and security of user sessions.
Steps to Protect Against Session Cookie Hijacking:
Secure Cookie Attributes:
- Ensure cookies have secure attributes set, such as
HttpOnlyandSecure.
Attribute Description HttpOnly Prevents client-side scripts from accessing the cookie. Secure Ensures the cookie is only sent over HTTPS. Set-Cookie: sessionId=abc123; HttpOnly; Secure- Ensure cookies have secure attributes set, such as
Enable SameSite Attribute:
- Use the
SameSiteattribute to prevent cross-site request forgery attacks.
SameSite Attribute Description Lax Allows sending cookies with same-site requests. Strict Restricts cookies to same-site requests only. Set-Cookie: sessionId=abc123; SameSite=Strict- Use the
Use Secure Tokens:
- Implement secure tokens for session management, ensuring they are unique and unpredictable.
Token Type Description CSRF Tokens Tokens to protect against cross-site request forgery. JWT Tokens JSON Web Tokens for secure session management. Implement Session Timeout:
- Set a reasonable session timeout to limit the duration a session remains active.
Timeout Setting Description Idle Timeout Logs out the user after a period of inactivity. Absolute Timeout Ends the session after a fixed period, regardless of activity. Monitor Session Activity:
- Continuously monitor session activity for anomalies and potential hijacking attempts.
Monitoring Tool Description Security Logs Logs to track session activity and detect anomalies. Intrusion Detection System System to identify and respond to suspicious activities. Educate Users:
- Inform users about best practices for session security, such as logging out after use and not sharing their session details.
By enforcing robust login page security and protecting session cookies, I can significantly enhance the security of user sessions in my web application. This proactive approach helps prevent unauthorized access and ensures the integrity of user data. Regular monitoring and user education are key components in maintaining effective session security.
9. Deployment and Integration
9.1 Deployment Modes
9.1.1 One-Arm Mode
One-arm mode is a deployment where the F5 BIG-IP Advanced WAF is connected to the network with a single interface, handling both inbound and outbound traffic. This mode is simpler to set up but has limitations in terms of network segmentation and security granularity.
Steps to Deploy in One-Arm Mode:
Configure Network Interface:
- Assign the interface an IP address and ensure it is reachable from the network.
config interface eth0 192.168.1.100 netmask 255.255.255.0Set Up Virtual Server:
- Define a virtual server to handle incoming traffic.
Field Description Virtual Server IP IP address for the virtual server. Service Port Port number (e.g., 80 for HTTP, 443 for HTTPS). Configure NAT:
- Enable Network Address Translation (NAT) to route traffic through the WAF.
nat add 192.168.1.0/24 10.0.0.0/24Apply Security Policies:
- Attach security policies to the virtual server to inspect and filter traffic.
Policy Description Web Application Policy Protects against common web vulnerabilities. DDoS Protection Policy Mitigates denial-of-service attacks. Monitor and Adjust:
- Continuously monitor traffic and adjust settings as needed to optimize performance and security.
9.1.2 Two-Arm Mode
Two-arm mode uses two separate interfaces for inbound and outbound traffic, offering better security and traffic management. It allows more precise control and isolation of network segments.
Steps to Deploy in Two-Arm Mode:
Configure Inbound and Outbound Interfaces:
- Assign IP addresses to both interfaces.
config interface eth0 192.168.1.100 netmask 255.255.255.0
config interface eth1 10.0.0.1 netmask 255.255.255.0
Set Up Virtual Servers:
- Define virtual servers for both inbound and outbound traffic.
Field Inbound Outbound Virtual Server IP 192.168.1.200 10.0.0.2 Service Port 80/443 80/443 Enable Routing:
- Configure routing to direct traffic through the correct interfaces.
route add 192.168.1.0/24 gw 192.168.1.1
route add 10.0.0.0/24 gw 10.0.0.1
Apply Security Policies:
- Attach appropriate security policies to each virtual server.
Policy Description Web Application Policy Protects against web vulnerabilities. DDoS Protection Policy Mitigates denial-of-service attacks. Monitor Traffic Flow:
- Use monitoring tools to observe and manage traffic flow through both interfaces.
9.2 Integration with SSL/TLS
SSL/TLS Decryption and Inspection
SSL/TLS decryption and inspection allow me to examine encrypted traffic for potential threats without compromising security.
Steps to Implement SSL/TLS Decryption and Inspection:
Install SSL Certificates:
- Upload and install SSL certificates on the F5 device.
Configure SSL Profiles:
- Set up SSL profiles for both client-side and server-side SSL/TLS.
Profile Description Client SSL Profile Manages SSL connections with clients. Server SSL Profile Manages SSL connections with backend servers. Attach SSL Profiles to Virtual Servers:
- Apply the SSL profiles to the relevant virtual servers for decryption and inspection.
Enable SSL Forward Proxy:
- Use SSL forward proxy to decrypt traffic, inspect it, and then re-encrypt it before forwarding.
forward-proxy enableMonitor and Adjust:
- Continuously monitor SSL traffic and adjust settings as necessary to maintain security and performance.
SSL/TLS Management
Managing SSL/TLS involves regular updates, monitoring, and configuration adjustments to ensure secure and efficient encryption.
Steps to Manage SSL/TLS:
Regularly Update Certificates:
- Ensure SSL certificates are renewed before expiration to maintain trust.
Monitor SSL/TLS Performance:
- Use monitoring tools to track SSL handshake times, encryption strength, and other performance metrics.
Metric Description Handshake Time Time taken to establish an SSL/TLS connection. Cipher Strength Strength of the encryption algorithm used. Enforce Strong Cipher Suites:
- Configure SSL/TLS profiles to use strong cipher suites and disable weak ones.
cipher-suite add strongImplement SSL/TLS Best Practices:
- Follow best practices such as enabling HSTS, using secure protocols, and applying perfect forward secrecy.
Best Practice Description HSTS Enforces secure connections by browsers. Perfect Forward Secrecy Ensures session keys are not compromised. Audit and Review:
- Conduct regular audits and reviews of SSL/TLS configurations and practices to ensure ongoing security.
Using these deployment modes and integrating SSL/TLS encryption ensures my web applications are secure, providing robust protection against various cyber threats while maintaining high performance and user trust. Regular monitoring and adherence to best practices are essential for maintaining a strong security posture.
10. Policy Management
Using Parent and Child Security Policies
Using parent and child security policies helps to manage complex security rules across multiple applications or environments by establishing a hierarchy. This ensures consistency and reduces administrative overhead.
Steps to Implement Parent and Child Security Policies:
Create a Parent Policy:
- Define a base security policy that includes common rules and settings.
Setting Description Base Rules Common security rules applicable to all apps. Logging Configuration Standard logging settings. create security-policy parent-policyCreate Child Policies:
- Define child policies that inherit settings from the parent policy but include specific rules for individual applications.
Setting Description Inherited Rules Rules inherited from the parent policy. Application-Specific Rules Custom rules for the specific application. create security-policy child-policy --parent parent-policyApply Policies to Applications:
- Assign child policies to respective applications to enforce the inherited and specific rules.
Application Policy App1 child-policy-app1 App2 child-policy-app2 Monitor and Adjust:
- Continuously monitor the effectiveness of policies and adjust parent or child rules as needed.
Advanced Policy Building Options
Advanced policy building options provide flexibility to create detailed and specific security rules tailored to different application needs.
Steps to Use Advanced Policy Building Options:
Define Policy Templates:
- Use predefined templates as a starting point for common scenarios.
Template Description Web Application Standard web app security settings. API Security API-specific security settings. create security-policy --template web-applicationCustomize Rules:
- Modify or add custom rules to address specific threats or requirements.
Rule Description SQL Injection Protection Detects and blocks SQL injection attempts. XSS Protection Detects and blocks cross-site scripting. Use Machine Learning:
- Implement machine learning to automatically adjust and optimize security rules based on traffic patterns.
enable machine-learningTest Policies:
- Use a staging environment to test policies before deploying them in production.
Environment Description Staging Test environment to validate policies. Production Live environment where policies are enforced. Deploy and Monitor:
- Deploy the policies and continuously monitor their performance, making adjustments as necessary.
Stabilizing a Security Policy
Stabilizing a security policy involves fine-tuning the rules to ensure they provide maximum protection without causing false positives or performance issues.
Steps to Stabilize a Security Policy:
Collect Baseline Data:
- Gather traffic and incident data to understand normal behavior and potential threats.
Metric Description Normal Traffic Patterns Typical user behavior and traffic volumes. Incident Frequency Frequency of security incidents. Adjust Sensitivity Levels:
- Modify the sensitivity of detection rules to balance between security and usability.
set detection-sensitivity moderateReduce False Positives:
- Analyze false positive incidents and adjust rules to minimize them without compromising security.
Incident Adjustment False SQL Injection Alerts Fine-tune SQL detection rules. False XSS Alerts Refine XSS detection parameters. Implement Rate Limiting:
- Apply rate limiting to mitigate the impact of high-volume attacks without affecting legitimate traffic.
rate-limit set 1000 requests/secRegular Review and Updates:
- Continuously review and update policies based on new threats and evolving application behavior.
11. Geolocation and Device Control
IP Geolocation Enforcement
IP Geolocation Enforcement restricts or allows access based on the geographic location of the incoming IP addresses.
Steps to Implement IP Geolocation Enforcement:
Enable Geolocation Database:
- Activate the geolocation database on the F5 device.
enable geolocation-databaseDefine Geolocation Rules:
- Create rules that specify which geographic regions are allowed or blocked.
Region Action United States Allow Russia Block create geolocation-rule allow us create geolocation-rule block ruApply Geolocation Rules:
- Attach the geolocation rules to the security policies.
Policy Geolocation Rule WebAppPolicy Allow US, Block RU Monitor Geolocation Logs:
- Regularly review logs to ensure geolocation rules are effective and adjust as needed.
12. WebSocket Protection
WebSocket protection secures WebSocket connections against attacks such as message tampering, injection, and DoS attacks.
What is WebSocket?
WebSocket is a communication protocol that provides full-duplex communication channels over a single TCP connection. This means that data can be sent and received simultaneously, allowing for real-time communication between a client (usually a web browser) and a server. WebSockets are particularly useful for applications that require low latency and high-frequency updates, such as:
- Chat Applications: WebSockets allow for instant messaging and notifications without the need for repeated HTTP requests.
- Live Feeds: Real-time updates for stock prices, news, sports scores, etc.
- Online Gaming: Real-time communication between players and servers for multiplayer games.
- Collaborative Platforms: Real-time document editing and collaboration tools like Google Docs.
WebSockets start as an HTTP request, which is then “upgraded” to a WebSocket connection, allowing for persistent and efficient communication.
WebSocket Protection Features
To ensure the security of WebSocket communications, it’s essential to implement protection mechanisms that guard against various types of attacks, such as:
- Message Tampering: Ensuring that messages are not altered during transit.
- Injection Attacks: Preventing malicious data from being injected into WebSocket messages.
- Denial of Service (DoS) Attacks: Mitigating attacks that aim to overwhelm the server with excessive requests.
Steps to Implement WebSocket Protection:
Enable WebSocket Protocol:
- Activate WebSocket support on the F5 device.
enable websocket-protocolConfigure WebSocket Profile:
- Set up a profile to define security settings for WebSocket connections.
Setting Description Max Message Size Maximum size of WebSocket messages. Connection Timeout Duration before idle connections are terminated. create websocket-profile max-message-size 1024 connection-timeout 60Apply WebSocket Profile to Virtual Server:
- Attach the WebSocket profile to the appropriate virtual server.
Virtual Server WebSocket Profile WebAppVS WebSocketProfile Enable Security Policies:
- Apply relevant security policies to inspect and filter WebSocket traffic.
Policy Description WebSocket Security Policy Protects against WebSocket-specific threats. apply security-policy websocket-securityMonitor WebSocket Traffic:
- Use monitoring tools to track WebSocket traffic and detect any anomalies or attacks.
| Step | Action |
|---|---|
| Enable WebSocket Protocol | Ensure that the WebSocket protocol is enabled in the security configuration of the Web Application Firewall (WAF). |
| Configure Security Profile | Set up a security profile that includes rules for message size limits, connection timeouts, and rate limiting. |
| Apply Profile to Server | Apply the configured security profile to the virtual server handling WebSocket connections. |
| Implement Security Policies | Define and enforce security policies to inspect WebSocket traffic and block suspicious activities. |
| Monitor Traffic | Continuously monitor WebSocket traffic to identify and respond to potential threats. |
These steps ensure robust policy management and advanced protection features, enabling me to maintain a secure and efficient web application environment. Regular monitoring and updates are crucial to adapt to new threats and evolving requirements.
tl;dr -> Entire Blog Tabulated
1. Policy Management
| Feature | Steps |
|---|---|
| Parent and Child Policies | Create a parent policy with base rules, establish child policies inheriting from the parent, apply policies to applications, monitor and adjust based on performance and new threats. |
| Advanced Policy Building | Use templates as starting points, customize rules for specific threats, utilize machine learning for optimization, test in staging environment, deploy and continuously monitor. |
| Stabilizing a Policy | Collect baseline traffic data, adjust sensitivity of detection rules, reduce false positives, implement rate limiting, regularly review and update policies. |
2. Geolocation and Device Control
| Feature | Steps |
|---|---|
| IP Geolocation Enforcement | Enable the geolocation database, define and apply geolocation rules (e.g., allow US, block RU), monitor geolocation logs and adjust rules as necessary. |
3. WebSocket Protection
| Feature | Steps |
|---|---|
| WebSocket Protection | Enable WebSocket protocol, configure security profile with message size limits and connection timeouts, apply profile to virtual server, implement security policies, monitor WebSocket traffic. |
4. Session Management and Protection
| Feature | Steps |
|---|---|
| Login Page Enforcement | Define login page settings, set authentication criteria, enable enforcement, configure response actions, apply and monitor. |
| Session Cookie Hijacking Protection | Secure cookie attributes with HTTPOnly and Secure flags, enable SameSite attribute, use secure tokens, implement session timeout, monitor session activity. |
5. Deployment and Integration
| Feature | Steps |
|---|---|
| One-Arm Mode Deployment | Configure network interface, set up virtual server, configure NAT, apply security policies, monitor and adjust. |
| Two-Arm Mode Deployment | Configure interfaces, set up virtual servers, enable routing, apply security policies, monitor traffic flow. |
| SSL/TLS Decryption and Inspection | Install SSL certificates, configure SSL profiles, attach profiles to servers, enable SSL forward proxy, monitor and adjust. |
| SSL/TLS Management | Regularly update SSL certificates, monitor performance, enforce strong cipher suites, implement best practices, audit and review. |
6. Application Protection Techniques
| Feature | Steps |
|---|---|
| XSS Protection | Activate XSS attack signatures, configure specific signatures, set up input validation, ensure output encoding, implement Content Security Policy (CSP), apply changes and monitor logs. |
| SQL Injection Protection | Activate SQLi attack signatures, configure specific signatures, set up parameter validation, use prepared statements, apply changes and monitor logs. |
| CSRF Protection | Activate CSRF protection, configure settings, set up CSRF tokens, implement SameSite cookies, apply changes and monitor logs. |
| Cookie Protection | Activate cookie protection, configure security settings, set HTTPOnly and Secure flags, implement cookie integrity with signing and encryption, apply changes and monitor logs. |
| Session Protection | Activate session protection, configure session handling settings, set up session timeouts, implement IP and device binding, apply changes and monitor logs. |
7. Data and Logging Management
| Feature | Steps |
|---|---|
| Data Guard | Activate Data Guard, configure sensitive data patterns, set masking rules, apply Data Guard to policies, monitor logs, define custom patterns, apply and monitor custom data protection. |
| Logging and Reporting | Activate logging, select log destination, define log levels, configure filters, apply logging settings, review logs regularly, access reporting module, customize report parameters, generate and review reports, export and share reports, schedule regular reporting. |
8. File and Parameter Enforcement
| Feature | Steps |
|---|---|
| File Type Enforcement | Define allowed file types, set actions for violations, apply changes, monitor for compliance. |
| Global File Type Settings | Add global file types, configure actions for all policies, apply settings, monitor compliance. |
| File Type Learning | Enable file type learning, review and approve learned file types, update policies, monitor compliance. |
| Parameter Enforcement | Define allowed parameters, configure actions for violations, apply changes, monitor compliance. |
| Global Parameter Settings | Add global parameters, configure actions for all policies, apply settings, monitor compliance. |
| Parameter Learning | Enable parameter learning, review and approve learned parameters, update policies, monitor compliance. |
| Parameter Types | Identify and configure parameter types, set actions for violations, apply changes, monitor compliance. |
| Blocking Parameter Tampering | Define validation rules for parameters, set actions for violations, apply changes, monitor compliance. |
| Entity Enforcement | Identify entities (e.g., URLs, parameters), define rules for them, set actions for violations, apply changes, monitor compliance. |
9. Bot Defense and DoS Protection
| Feature | Steps |
|---|---|
| Bot Defense Profile | Create and configure bot defense profile, define detection and response actions, apply profile, monitor and adjust. |
| Blocking Suspicious Browsers | Configure browser blocking rules, set actions for violations, apply changes, monitor and adjust. |
| Layer 7 DoS Protection | Create DoS protection profile, configure detection settings, define response actions, apply profile, monitor and adjust. |
| Behavioral Layer 7 DoS Protection | Enable behavioral analysis, configure baseline traffic patterns, define detection criteria, set actions for anomalies, apply changes, monitor and adjust. |
10. Attack Detection and Prevention
| Feature | Steps |
|---|---|
| Single Username Attacks | Configure detection settings for single username attacks, define response actions, apply profile, monitor and adjust. |
| Multi-Username Attacks | Configure detection settings for multi-username attacks, define response actions, apply profile, monitor and adjust. |
| Distributed Brute Force Attacks | Enable protection for distributed brute force attacks, configure detection settings, define response actions, apply settings, monitor and adjust. |
| Credential Stuffing Attacks | Enable protection for credential stuffing attacks, configure detection settings, define response actions, apply profile, monitor and adjust. |
11. Threat Detection Techniques
| Feature | Steps |
|---|---|
| Using Attack Signatures | Enable attack signatures, select appropriate sets, configure enforcement actions, apply settings, monitor and update signatures. |
| Custom Attack Signatures | Create custom attack signatures, define detection details, set response actions, apply signatures, test for effectiveness, monitor and adjust. |
| Detection by Username | Enable username-based tracking, define detection criteria, configure response actions, apply settings, monitor and adjust. |
| Detection by Device | Enable device-based tracking, define detection criteria, configure response actions, apply settings, monitor and adjust. |
Word Quiz
Correct := 0 | Wrong := 0
Question?
Fill the Answer
Correct:= 0 | Wrong:= 0
Question
Comments
comments powered by DisqusRelated Posts

Python: Part 1
Python is a versatile and high-level language known for its simplicity and readability, widely used in software development, data analysis, web development, and automation tasks.
Read More
DNS for Dummies: Part 3
In this part we will be getting our hands dirty and setting up our own personal DNS server using an ubuntu virtual machine.
Read More
Breaking Free from Tutorial Overload
Breaking Free from Tutorial Overload: A simple guide to learning successfully and stop being on a learning treadmill but not moving forward
Read More